


You often hear news about cyber attacks where perpetrators “spoof” IP addresses or MAC addresses, to name a few. What exactly does this mean though? Is this a complicated thing to do and how can we better protect ourselves?
If you think this is a complicated task to accomplish or requires some type of computer wizardry, well, you’re on the right track but it’s not as complicated as you may think. Personally, I tend to over-complicate things myself at times, but the best way to validate if something’s complex or not is really to just test it out by doing it yourself. So, here we go – let’s learn how to spoof a few things! This post will cover spoofing IP addresses and MAC addresses.
What You Need in Order To Follow Along:
- At least two network hosts (computers, laptops, etc.) with administrative access; virtual machines would work just fine and are actually preferred
- If using a VM, download a virtual machine manager (VirtualBox, VMware Fusion / Workstation)
- The ability to download and install Wireshark for packet captures
- Installing the Python scripting language, specifically the “Scapy” module
How to Test Spoofing:
- Depending on which operating system you’re using, download the appropriate virtualization software if you plan on virtualizing this scenario
- Ensure the hosts are set up to be on the same network and that they can communicate with one another
- Download, install and run Wireshark
- Download the latest version of Python along with the Scapy module
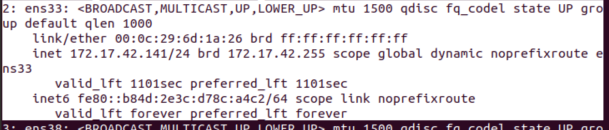
As for me, my testbed consists of my MacBook Pro using VMware Fusion along with an Ubuntu VM and a Windows 10 client. I have Python, Scapy and Wireshark already installed and ready to go. To start, here are screenshots of my Ubuntu instance (IP address in this case in 172.17.42.141) and my Windows instance. I simply ran “ip addr” in my terminal to view both the IP address and the MAC address:

Pinging from Ubuntu over to my Windows 10 instance (IP address is 172.17.42.140):


![]()

![]()

And Wireshark showing the details of this:


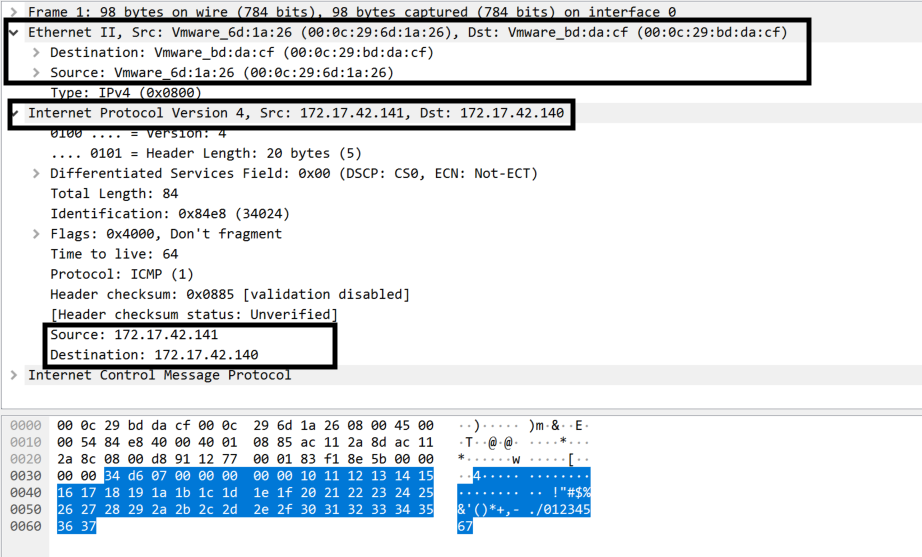
To be clear, we see two ping requests in 4 packets under the “No.” column on the left side. Under the “Info” column you can see “Echo (ping) request…” or “Echo (ping) reply…”. The request is just that – my Ubuntu host requesting a response from the IP it’s pinging (in this case my Windows 10 instance). The replies are responses to those requests, much like saying “hi” to someone and receiving a replay back (note that responses from individuals may vary depending on that individual).
Packets 1 and 3 originate from my Ubuntu IP and the responses are packets 2 and 4. You can see the designated IPs in the “Source” / “Destination” column of the above screenshot.
What I’m going to do now is focus on just the first packet by double-clicking on that packet and expanding the “Ethernet II” and “Internet Protocol Version 4” sections. I annotated the specific portions we’re going to look at to reduce the clutter in there – and there is quite a bit of data in there that is beyond the scope of this blog:

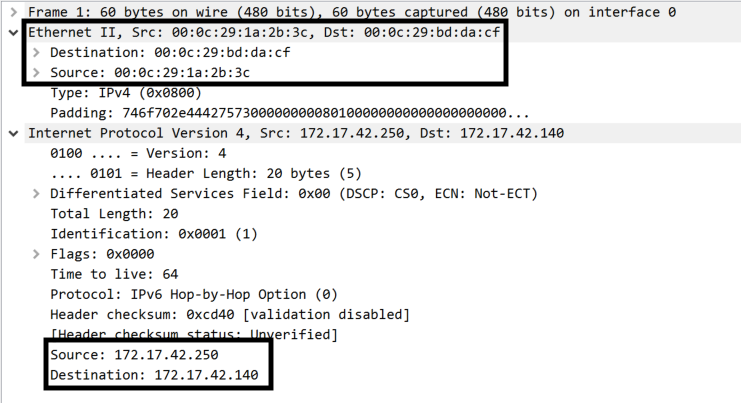
If you notice the earlier screenshots that pictured the MAC address, or rather what’s known as “Physical Address” in Windows and “link/ether” in Ubuntu’s output. So far they both match up; the MAC address and the IP address. Let’s go ahead and move forward with the spoofing steps. Here is a screenshot of the spoofed IP address on my Ubuntu instance sending this specially crafted packet to the Windows instance:
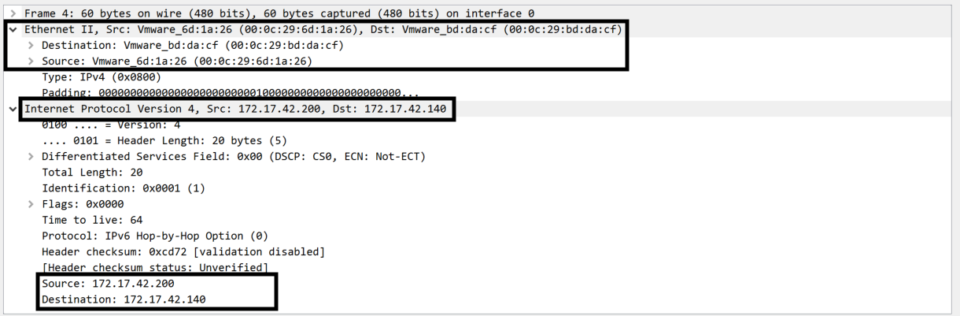

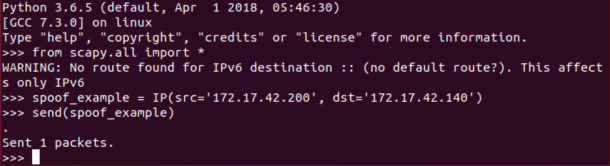
What you’ll notice here is that the “Ethernet II” description has the same MAC address as the previous screenshot, but the IP address “Source” differs from what “ip addr” has displayed. This is a screenshot of the commands used within Python to accomplish this:

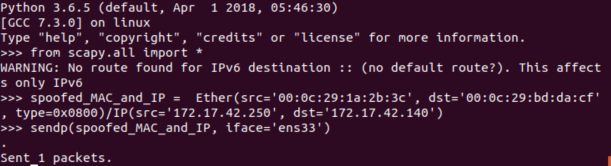
Now we can expand on this constructor quite a bit but to stay in-line with this blog’s target, let’s take this another step further and modify our MAC address as well as spoof our IP address in one swoop:

At this point it is hard for you as the reader to validate the spoofed MAC and IP address; however, I assure you that this was all manually achieved using the same two VMs as mentioned above. Here is the Python / Scapy commands to do so:

Okay, so if you’re still with me and I didn’t lose you, let’s now wrap this post up with the answer to the other question – how can we better protect ourselves in situations like these?
Fortunately for IP address spoofing, WatchGuard does this by default and is as simple as you could imagine. There is a feature known as Default Threat Protection that validates incoming requests on the specified interface. Read this for official documentation but in short, the WatchGuard firewall verifies incoming packets and their destination on many levels. As an example, if a computer from the internet on interface 0 for instance (the default External interface that allows internet-bound communications) has a spoofed IP address of an internal IP address, this triggers the firewall’s “spidey” senses and blocks this.
As for spoofing MAC addresses, that isn’t as easy because clients themselves are sending arbitrary MAC addresses and a firewall cannot control what they send, only what the firewall does to handle such circumstances. In addition to this, MAC addresses don’t traverse the internet, only local network traffic. So if you’re concerned about MAC spoofing and there is a legitimate threat, then that means you have bigger issues due to an attacker potentially already being within the local network. There is an ability to whitelist / blacklist MAC addresses but that can be defeated by said attacker. Now what you can do is initialize some sort of authentication requirements which forces clients to authenticate against an authentication server by entering credentials, only then permitting access. There is a process to do this which can be found here.
References
Biondi, P. et all. Welcome to Scapy’s documentation!Retrieved from https://scapy.readthedocs.io/en/latest/index.html
Pierre (December 26, 2017). Understanding the Scapy “Mac address to reach destination not found. Using broadcast.” Warning [1stAnswer]. Retrieved from https://stackoverflow.com/questions/18625072/understanding-the-scapy-mac-address-to-reach-destination-not-found-using-broad